http://adventurephotonvideo.multiply.com/photos/album/7#
Tips mendapatkan ROL


 Minggu 26 Oktober 2008,
 | Start: | Dec 19, '08 10:00a |
| End: | Dec 20, '08 |
| Location: | Tangerang-Banten |


 Taken From : http://www.lifepixel.com/index.html
Disclaimer: This tutorial is made available for informational purposes only. Tampering with your camera will void your manufacturer's warranty. If you decide to perform the conversion you could damage your camera or be hurt or get killed from the high voltage present - you do so at your own risk, we are not responsible for camera damage or any harm you may suffer or any special or consequential damages.
Webmasters: Please do not hot link or copy content, instead you may link to this page like this: Infrared Conversion Instructions
You will need these tools & supplies to follow the Rebel XT infrared conversion tutorial:
- Our custom glass infrared filter to replace the hotmirror
- Soldering iron and desoldering wick or desoldering gun
- Black silicone adhesive /w syringe type dispenser
- Small philips type screwdriver
- Tweezers
- Canned air
- Lens cleaning solution & tissue
- Grounding strap /w current limit resistor
If you prefer not to risk damage to your camera, have us convert it for you here. It would be best to perform the conversion in a well lit area that is as clean and dust free as possible. Wearing a grounding strap will minimize the chance of zapping your camera with static and most likely rendering it dead.
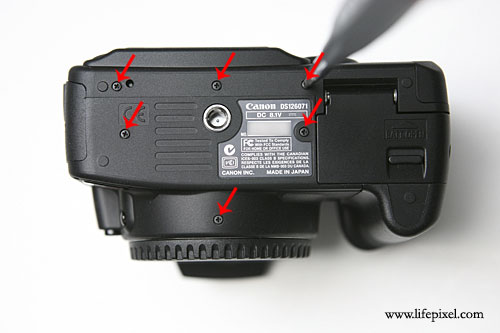
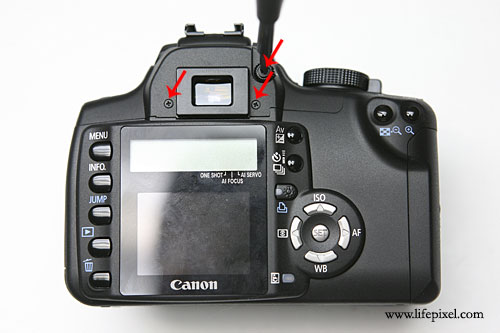
Remove marked screws.
Remove marked screws.
Remove marked screws.
Remove marked screws and diopter adjustment knob.
Remove marked screws.
Remove marked screws.
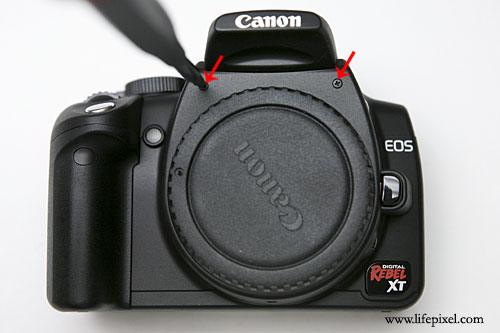
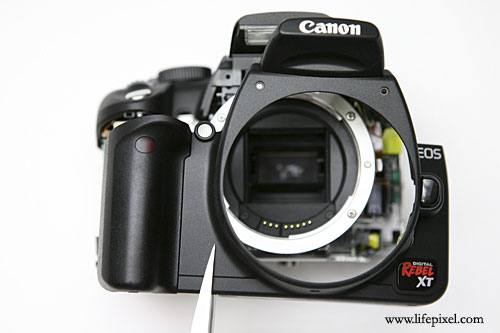
Remove the front cover.
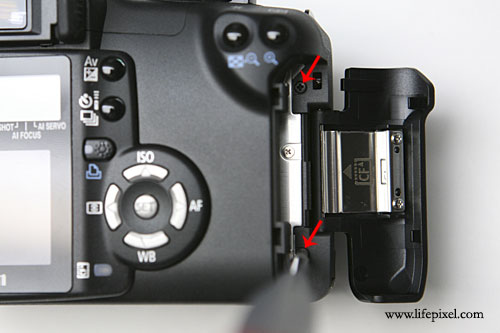
Flip over the rear LCD panel and disconnect marked cables.
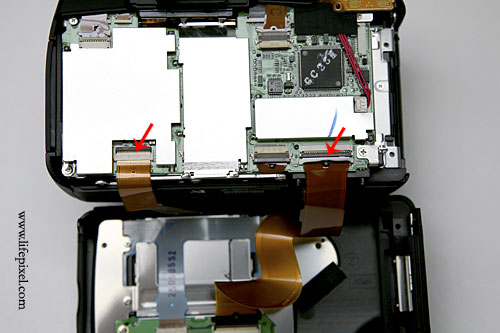
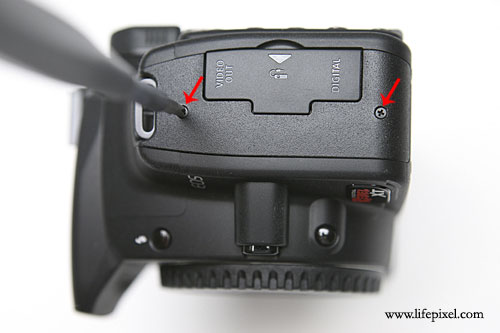
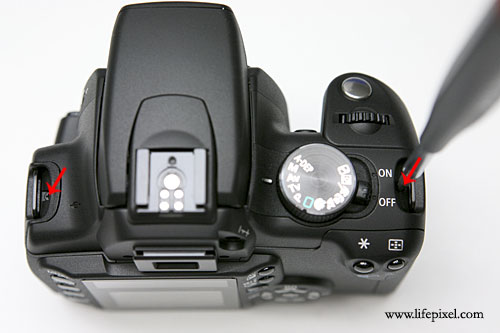
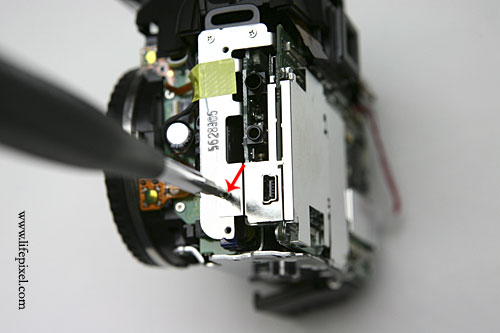
Disconnect marked cables and remove the I/O port cover (blue arrow).
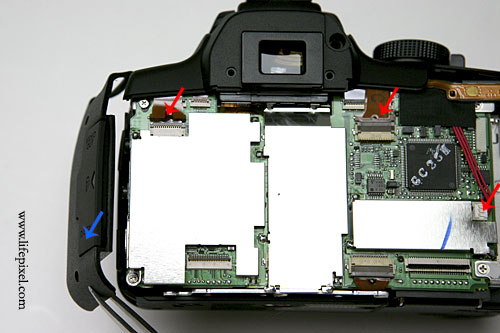
Push up the top cover and remove the black tape.
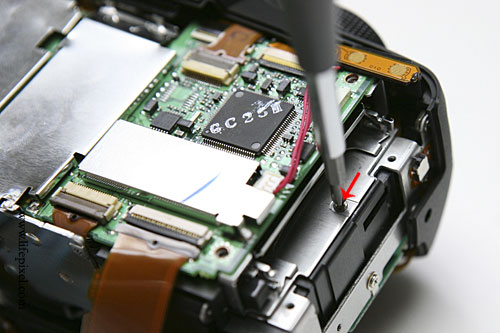
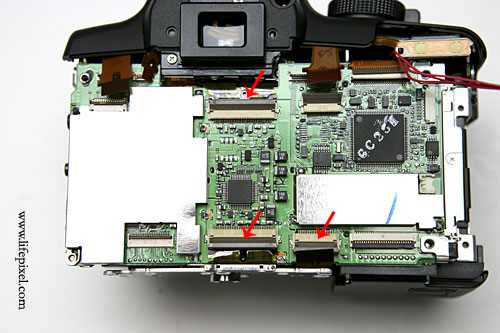
Disconnect marked connectors and screws.
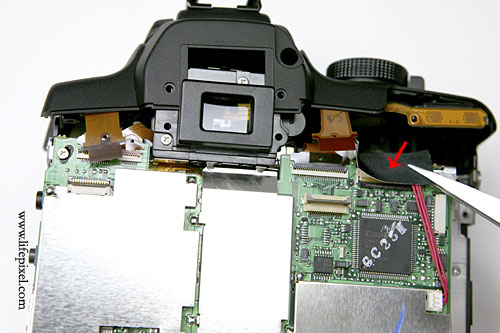
Remove marked screw.
Remove marked screw.
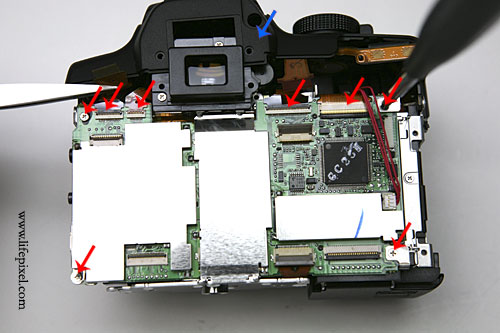
Desolder the marked solder joints.
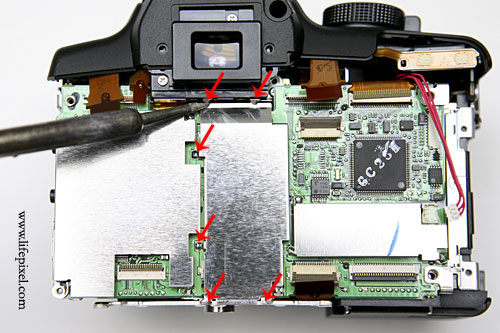
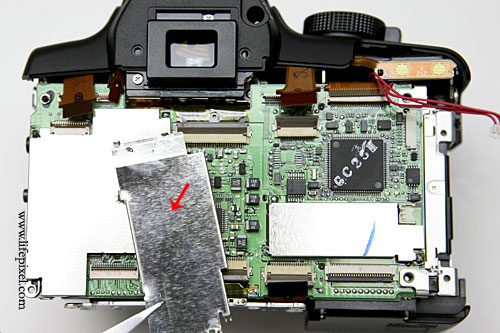
Lift out the metal shield.
Disconnect the marked ribbon cables and flip over PCB.
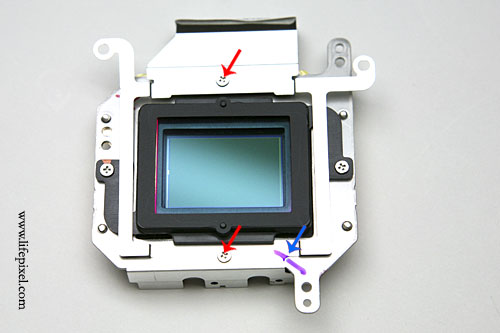
Remove marked screws and lift out the sensor assembly.

Paint a mark as shown with blue arrow to help with reassembly. Remove marked screws.
Remove marked screws.
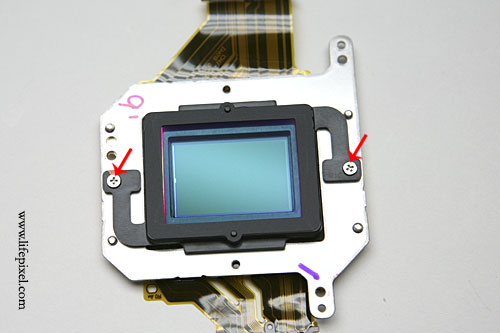
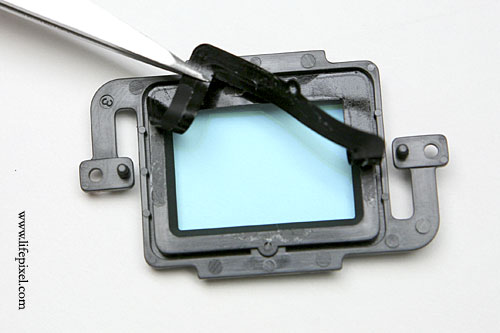
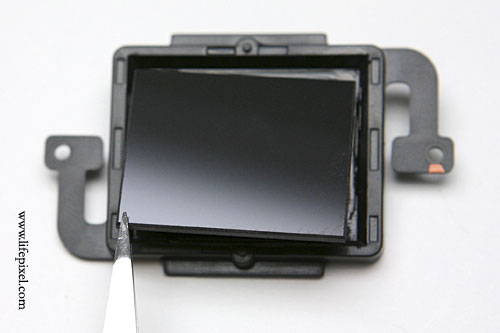
Lift out the hot mirror filter assembly.
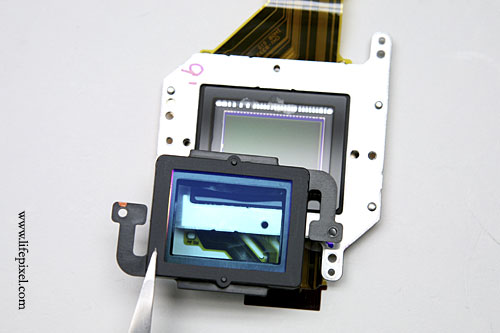
Gently peel off the double stick tape gasket.
Peel off the black mask.
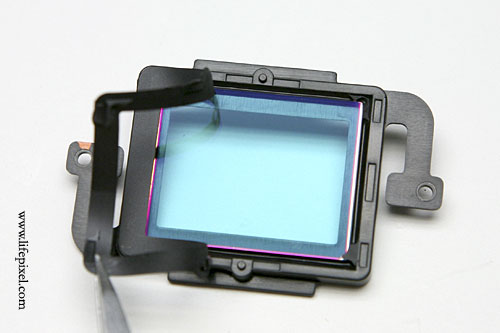
Gently cut through the adhesive around the hot mirror filter.
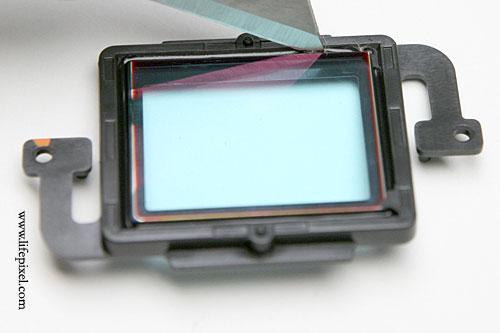
Remove the hot mirror filter.
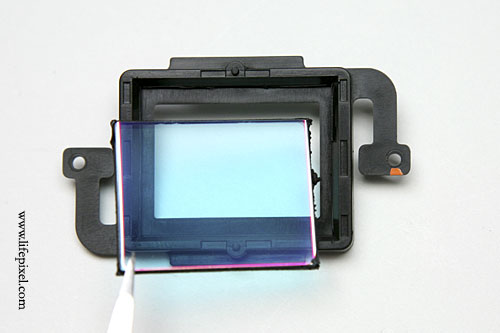
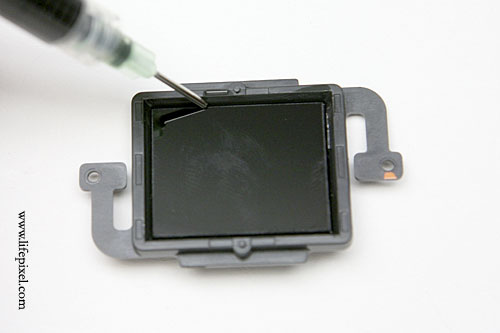
Place the infrared filter in position.
Apply black silicone seleant around the infrared filter to fix in position and seal out dust.
After adhesive is fully cured clean the ir filter with lens cleaner and tissue, blow off with canned air and reassemble everything by following the instructions backwards. Set a custom white balance per our instructions page and take some test shots to make sure there is no dust trapped between the sensor and infrared filter. If you find dust and find it objectionable disassemble the camera again, blow off the sensor with canned air (make sure only air and no liquid is coming out by purging and holding it upright) and re cleaning the infrared filter.
If you prefer not to risk damage to your camera, have us convert it for you here.

Buat yang gak punya filter IR!
Taken From : Tutorialelf (Online tutorial)
Infrared photography (also referred to as just IR) has been around for many years, but now with digital photography and Photoshop, creating the effect digitally is on the top of a lot of people's photography effects wish lists. There are some third-party plug-ins you can buy that will give you pretty decent IR effects, but you don't have to go that route. You can create some amazing infrared effects, both black and white and color, from right within Photoshop using the Channel Mixer (which is what we're going to do in this tutorial).
Before digital, you'd have to use special infrared film (Kodak made a popular brand of black-and-white infrared slide film) which had extended sensitivity to red colors that fall beyond what the naked eye (or traditional color film) could see. This IR film made blue skies look almost black, but it would keep the clouds looking white. It made green trees and grass look almost white, and if you used it on portraits, skin tones (eyes and teeth) took on an otherworldly feel, as well.
So, here are two different ways to achieve IR effects in Photoshop that people would swear were done with real IR film (which, by the way, is still made by a number of classic film manufacturers, including Kodak, who makes a High-Speed Infrared Black-and-White film, along with Ilford's SFX 200 IR film, and Maco's IR 820c film).
Step 1. OPEN THE PHOTO, THEN ADD A CHANNEL MIXER ADJUSTMENT LAYER
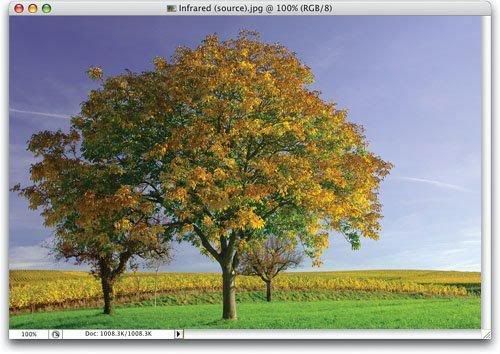
Open the photo you want to convert into an infrared image. The infrared look is often used with landscape photography (although you see it on portraits in some cases), so we're using a landscape photo here, with plenty of green grass, and some wisps of clouds in the sky. You'll use the Channel Mixer to create your infrared effect, so choose it from the Create New Adjustment Layer pop-up menu at the bottom of the Layers palettethe Channel Mixer dialog is shown in the next step.
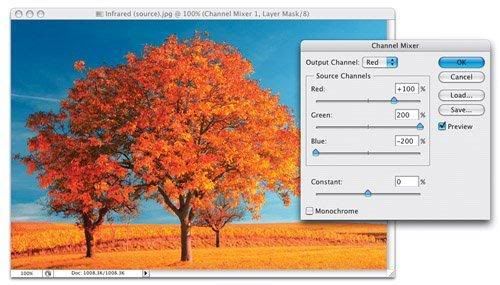
Step 2. LEAVE THE RED AT +100%, INCREASE THE GREEN TO +200%, LOWER THE BLUE TO -200%
Generally, in landscape photos (like this one), we're trying to maximize the amount of green in the image, so we're going to pump up the green. Then we'll balance things out to where the values add up to 100% by subtracting from the Red and Blue channels. (Note: When we did our black-and-white conversions earlier, we weren't worried about adding up to 100%, but in infrared, if they don't add up to 100%, you'll have a color tint when you're done.) So, leave the Red at +100, for Green enter +200, and for Blue enter -200, but don't click OK yet.
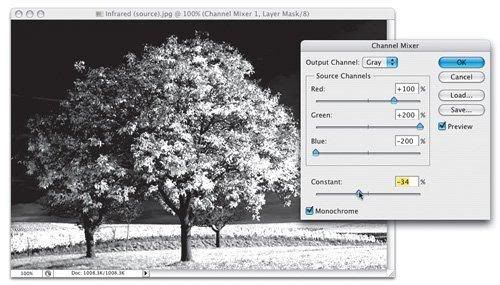
Step 3. TURN ON THE MONOCHROME CHECKBOX, THEN LOWER THE CONSTANT TO PRESERVE HIGHLIGHTS.
Now, click the Monochrome checkbox at the lower-left corner of the dialog (as shown here) to convert the photo to black and white. If the whites in your image are blown out (they were in this image), lower the Constant slider until the whites aren't so blown out (I had to lower it to -34%). You can now click OK, and you've got a black-and-white infrared effect. You can stop at this point, or if you want a color infrared effect, go on to the next step (you'll want to continue on anyway, because we do a slightly different infrared technique after that).
Step 4. FOR A COLOR INFRARED EFFECT, CHANGE THE ADJUSTMENT LAYER'S BLEND MODE TO LIGHTEN
To bring the color effect into your black-and-white infrared, just change the blend mode of your Channel Mixer adjustment layer to either Lighten (as shown here) or Screen (if you choose Screen, lower the opacity until it looks right). As an optional step, you can add the white "glow" of classic film infrared photography by pressing X to set your Foreground color to white, flattening the image, then going under the Filter menu, under Distort, and choosing Diffuse Glow. Try setting the Graininess at 3, the Clear Amount to 15, then slowly drag the Glow Amount slider to the right until you get a slight glow without blowing out the highlights. Now, on to an alternate method.

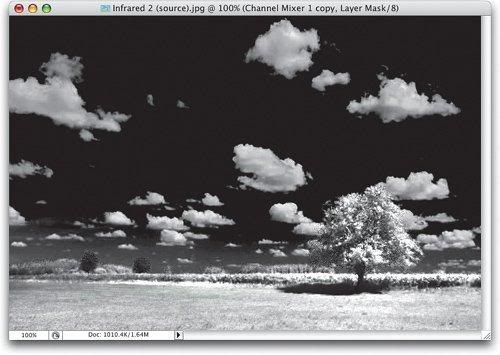
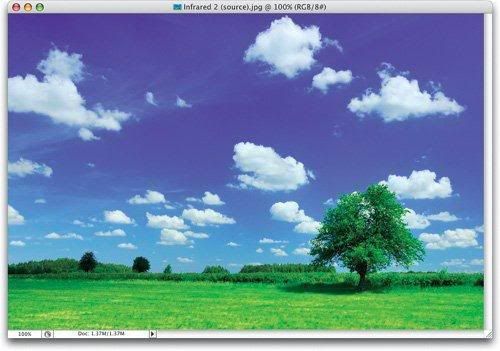
Step 5. OPEN ANOTHER IMAGE
This next method works well when there's a nice rich sky with lots of blue, and with lots of clouds (like the photo shown here). This time we're going to use a couple of masks to get the traditional infrared effect, where the sky turns almost black but the clouds just pop out at you in stark white, and the tree leaves turn really white. It sounds bad, but it's a beautiful thing when done right.
Step 6. USE THE CHANNEL MIXER USING THE SAME VALUES AS BEFORE, BUT THIS BLOWS OUT THE HIGHLIGHTS
Create a Channel Mixer adjustment layer again, turn on the Monochrome checkbox, and enter these values: leave the Red at +100, increase the Green to +200, then decrease the Blue to -200 to create that black sky and white trees and ground, but don't click OK yet. Now, although the sky, clouds, and trees look great, the ground is completely and totally blown out. So, we're going to have to do a little layer masking to create the perfect infrared photo. This is the ideal photo to do this on because you'll run across plenty of images where you'll need to do the sky separately from the ground to keep detail in both areas.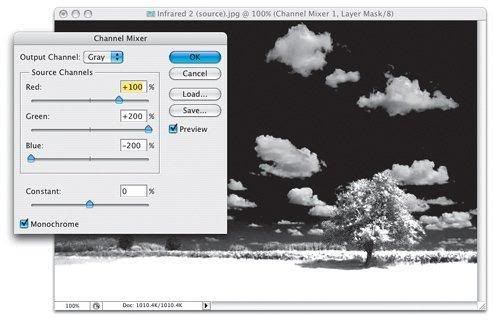
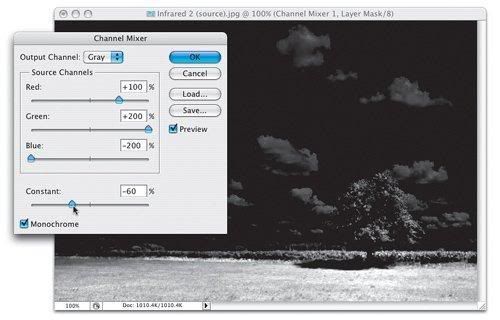
Step 7. LOWER THE CONSTANT UNTIL THE GROUND DETAIL REAPPEARS, EVEN THOUGH THE SKY IS NOW TOO DARK
We're now going to temporarily sacrifice the sky to get the ground back, so drag the Constant slider to the left until the detail in the ground reappears (as shown here, where I had to lower the Constant to -60% to get the ground back), then click OK.
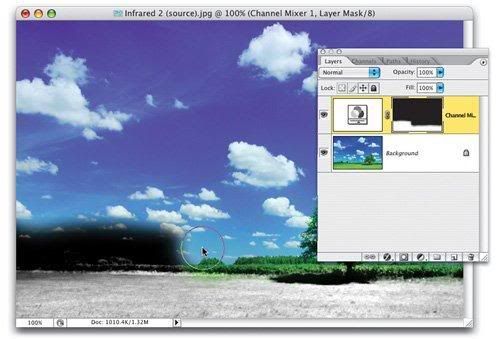
Step 8. WITH BLACK AS YOUR FOREGROUND COLOR, PAINT OVER THE SKY TO CONCEAL JUST THE SKY
Press X to set black as your Foreground color, then get the Brush tool (B), choose a large soft-edged brush, and start painting over the sky (don't worryyou're painting on the mask, not the photo itself). Paint over the entire sky, and as you paint in black, those infrared areas become hidden (concealed) from view, leaving just the ground still having the infrared effect applied. Your mask's thumbnail (in the Layers palette) will look like the one shown herewith black over the sky, and white revealing the Channel Mixer edits you made in the previous step.
Step 9. DUPLICATE THE ADJUSTMENT LAYER, THEN INVERT THE MASK BY PRESSING COMMAND-I (PC: CONTROL-I)
Now, duplicate the Channel Mixer adjustment layer (the quickest way is to just press Command-J [PC: Control-J]). Press Command-I (PC: Control-I) to Invert the mask, so now the black part (the concealed part) is at the bottom, and the white area (the part of the area to be revealed) is on top. Of course, at this point, all it looks like is that we brought the really dark sky from two steps ago right back, but we're about to fix that.
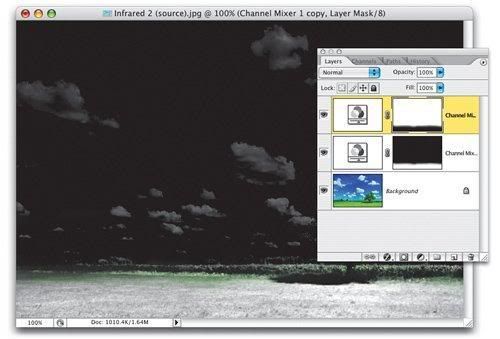
Step 10. REOPEN THE CHANNEL MIXER AND RAISE THE CONSTANT BACK UP TO 0%
In the Layers palette, double-click directly on the Channel Mixer adjustment layer's thumbnail to bring up the Channel Mixer dialog with the settings you last input. The Constant slider will still be set at -60%, so all you have to do (to bring back the nice sky again) is raise that back up to 0% to get the effect you see here, which combines the nice sky with the good detail ground. We used two different masks: (1) to create the good ground and cover the sky, and (2) to hide the ground and reveal the good sky. If you see any green along the ground where the two masks meet (like you do here), press X to set your Foreground color to white and just paint it away.

Step 11. IF ANY COLOR AREAS SHOW, PAINT OVER THEM IN WHITE TO COMPLETE THE EFFECT (AS SHOWN HERE)
Here's the final image, with that green painted away by painting on the mask in white. It combines the good sky and the good ground, which together create one heck of a realistic infrared black-and-white effect.