
Rabu, 30 Juli 2008
Senin, 28 Juli 2008
Infrared Effect - Adobe Photoshop
Buat yang gak punya filter IR!
Taken From : Tutorialelf (Online tutorial)
Infrared photography (also referred to as just IR) has been around for many years, but now with digital photography and Photoshop, creating the effect digitally is on the top of a lot of people's photography effects wish lists. There are some third-party plug-ins you can buy that will give you pretty decent IR effects, but you don't have to go that route. You can create some amazing infrared effects, both black and white and color, from right within Photoshop using the Channel Mixer (which is what we're going to do in this tutorial).
Before digital, you'd have to use special infrared film (Kodak made a popular brand of black-and-white infrared slide film) which had extended sensitivity to red colors that fall beyond what the naked eye (or traditional color film) could see. This IR film made blue skies look almost black, but it would keep the clouds looking white. It made green trees and grass look almost white, and if you used it on portraits, skin tones (eyes and teeth) took on an otherworldly feel, as well.
So, here are two different ways to achieve IR effects in Photoshop that people would swear were done with real IR film (which, by the way, is still made by a number of classic film manufacturers, including Kodak, who makes a High-Speed Infrared Black-and-White film, along with Ilford's SFX 200 IR film, and Maco's IR 820c film).
Step 1. OPEN THE PHOTO, THEN ADD A CHANNEL MIXER ADJUSTMENT LAYER
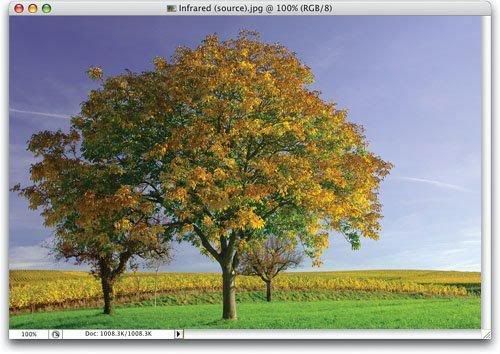
Open the photo you want to convert into an infrared image. The infrared look is often used with landscape photography (although you see it on portraits in some cases), so we're using a landscape photo here, with plenty of green grass, and some wisps of clouds in the sky. You'll use the Channel Mixer to create your infrared effect, so choose it from the Create New Adjustment Layer pop-up menu at the bottom of the Layers palettethe Channel Mixer dialog is shown in the next step.
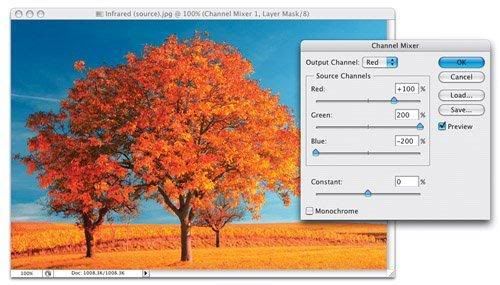
Step 2. LEAVE THE RED AT +100%, INCREASE THE GREEN TO +200%, LOWER THE BLUE TO -200%
Generally, in landscape photos (like this one), we're trying to maximize the amount of green in the image, so we're going to pump up the green. Then we'll balance things out to where the values add up to 100% by subtracting from the Red and Blue channels. (Note: When we did our black-and-white conversions earlier, we weren't worried about adding up to 100%, but in infrared, if they don't add up to 100%, you'll have a color tint when you're done.) So, leave the Red at +100, for Green enter +200, and for Blue enter -200, but don't click OK yet.
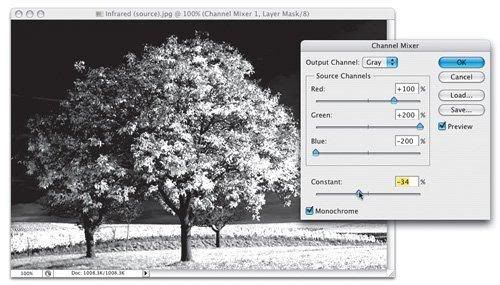
Step 3. TURN ON THE MONOCHROME CHECKBOX, THEN LOWER THE CONSTANT TO PRESERVE HIGHLIGHTS.
Now, click the Monochrome checkbox at the lower-left corner of the dialog (as shown here) to convert the photo to black and white. If the whites in your image are blown out (they were in this image), lower the Constant slider until the whites aren't so blown out (I had to lower it to -34%). You can now click OK, and you've got a black-and-white infrared effect. You can stop at this point, or if you want a color infrared effect, go on to the next step (you'll want to continue on anyway, because we do a slightly different infrared technique after that).
Step 4. FOR A COLOR INFRARED EFFECT, CHANGE THE ADJUSTMENT LAYER'S BLEND MODE TO LIGHTEN
To bring the color effect into your black-and-white infrared, just change the blend mode of your Channel Mixer adjustment layer to either Lighten (as shown here) or Screen (if you choose Screen, lower the opacity until it looks right). As an optional step, you can add the white "glow" of classic film infrared photography by pressing X to set your Foreground color to white, flattening the image, then going under the Filter menu, under Distort, and choosing Diffuse Glow. Try setting the Graininess at 3, the Clear Amount to 15, then slowly drag the Glow Amount slider to the right until you get a slight glow without blowing out the highlights. Now, on to an alternate method.

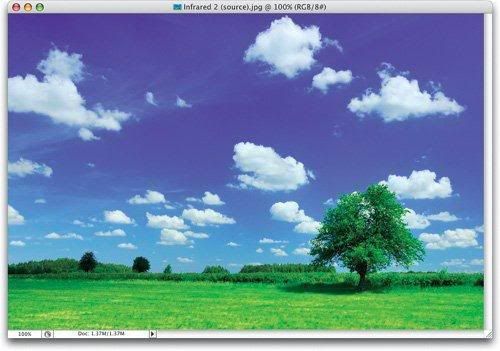
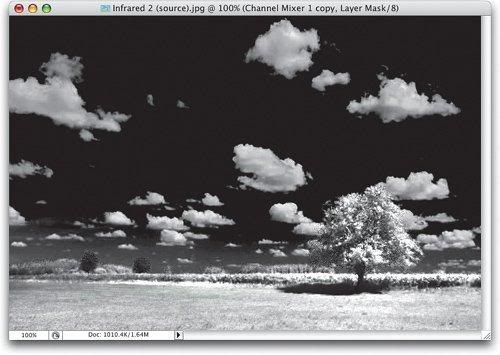
Step 5. OPEN ANOTHER IMAGE
This next method works well when there's a nice rich sky with lots of blue, and with lots of clouds (like the photo shown here). This time we're going to use a couple of masks to get the traditional infrared effect, where the sky turns almost black but the clouds just pop out at you in stark white, and the tree leaves turn really white. It sounds bad, but it's a beautiful thing when done right.
Step 6. USE THE CHANNEL MIXER USING THE SAME VALUES AS BEFORE, BUT THIS BLOWS OUT THE HIGHLIGHTS
Create a Channel Mixer adjustment layer again, turn on the Monochrome checkbox, and enter these values: leave the Red at +100, increase the Green to +200, then decrease the Blue to -200 to create that black sky and white trees and ground, but don't click OK yet. Now, although the sky, clouds, and trees look great, the ground is completely and totally blown out. So, we're going to have to do a little layer masking to create the perfect infrared photo. This is the ideal photo to do this on because you'll run across plenty of images where you'll need to do the sky separately from the ground to keep detail in both areas.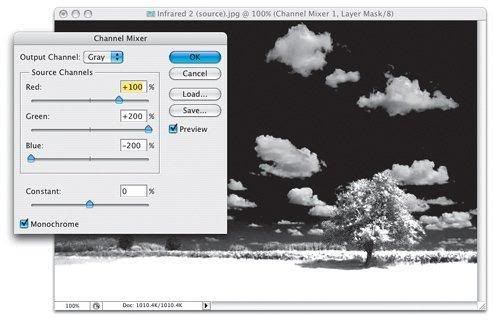
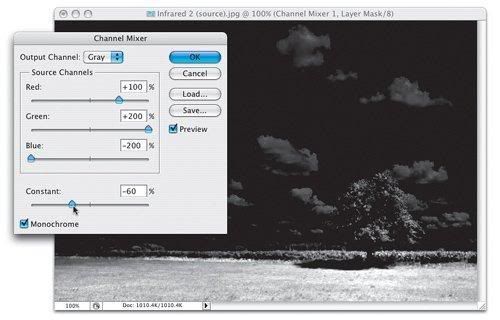
Step 7. LOWER THE CONSTANT UNTIL THE GROUND DETAIL REAPPEARS, EVEN THOUGH THE SKY IS NOW TOO DARK
We're now going to temporarily sacrifice the sky to get the ground back, so drag the Constant slider to the left until the detail in the ground reappears (as shown here, where I had to lower the Constant to -60% to get the ground back), then click OK.
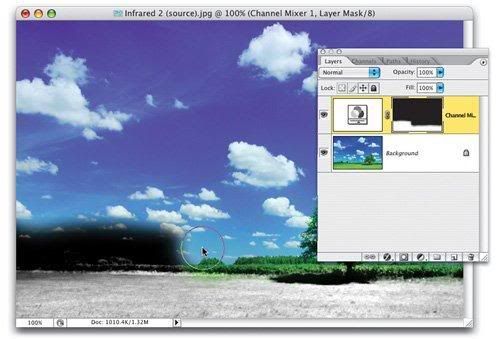
Step 8. WITH BLACK AS YOUR FOREGROUND COLOR, PAINT OVER THE SKY TO CONCEAL JUST THE SKY
Press X to set black as your Foreground color, then get the Brush tool (B), choose a large soft-edged brush, and start painting over the sky (don't worryyou're painting on the mask, not the photo itself). Paint over the entire sky, and as you paint in black, those infrared areas become hidden (concealed) from view, leaving just the ground still having the infrared effect applied. Your mask's thumbnail (in the Layers palette) will look like the one shown herewith black over the sky, and white revealing the Channel Mixer edits you made in the previous step.
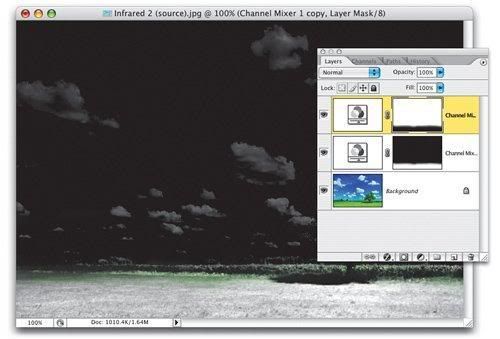
Step 9. DUPLICATE THE ADJUSTMENT LAYER, THEN INVERT THE MASK BY PRESSING COMMAND-I (PC: CONTROL-I)
Now, duplicate the Channel Mixer adjustment layer (the quickest way is to just press Command-J [PC: Control-J]). Press Command-I (PC: Control-I) to Invert the mask, so now the black part (the concealed part) is at the bottom, and the white area (the part of the area to be revealed) is on top. Of course, at this point, all it looks like is that we brought the really dark sky from two steps ago right back, but we're about to fix that.
Step 10. REOPEN THE CHANNEL MIXER AND RAISE THE CONSTANT BACK UP TO 0%
In the Layers palette, double-click directly on the Channel Mixer adjustment layer's thumbnail to bring up the Channel Mixer dialog with the settings you last input. The Constant slider will still be set at -60%, so all you have to do (to bring back the nice sky again) is raise that back up to 0% to get the effect you see here, which combines the nice sky with the good detail ground. We used two different masks: (1) to create the good ground and cover the sky, and (2) to hide the ground and reveal the good sky. If you see any green along the ground where the two masks meet (like you do here), press X to set your Foreground color to white and just paint it away.

Step 11. IF ANY COLOR AREAS SHOW, PAINT OVER THEM IN WHITE TO COMPLETE THE EFFECT (AS SHOWN HERE)
Here's the final image, with that green painted away by painting on the mask in white. It combines the good sky and the good ground, which together create one heck of a realistic infrared black-and-white effect.
Kamis, 24 Juli 2008
Foto Untuk Nita & Rosi

Disuruh Moto-in ma nyokapnye Nita buat di taroh di depan tenda. Kalo gak bagus ya makelum aja,namanya juga amatiran :D.
Objek : Nita & Rosi
Lokasi : Daru, Tigaraksa, Banten.
Tukang Jepret : Si Keren
Selasa, 22 Juli 2008
Limewire yang bikin Kesel

Sudah seminggu bingung ngeliatin bandwidth monitor yang mentok mulu di batas maksimum, akhirnya terjawab sudah hari ini.
Tahap Pertama : Mencari tersangka.
------------------------------------------------------
prasangka buruk tentang user yang menggunakan download manager untuk mendownload dari internet akhirnya terbuka, dan tersangka utamanya dalah software sharing yang bernama "limewire", software ini sejenis denga software kaza yang dulu sempat tenar sebagai software yang memudahkan kita untuk mencari file2 di internet. tapi tanpa disadari penggunanya bahwa dengan menginstall software2 sharing tersebut, meraka juga membuka celah pada komputer mereka untuk di masuki oleh pengguna software-software sharing lainnya di internet.
Tahap Kedua : Solusi
------------------------------------------------------
Ok, tahap selanjutnya adalah bagaimana cara menangkal koneksi dari lime wire tersebut, langkah ini memerlukan analisa dari traffic yang dibuat oleh software limewire ketika software tersebut mulai dioperasikan sampai pada tahap mendowload-an file.
Analisa Sepihak :dari data traffic internet di dapat bahwa sewaktu kita mulai mengoprasikan limewire, dan mulai mencari file melalui software itu, limewire berusaha untuk melakukan kontak dengan website http://results.limewire.com. Jika file-file yang sesuai dengan kata kunci yang kita cari telah terlihat, kita baru bisa melakukan proses download,nah sewaktu kita menklik tombol download itu,lime wire akan mulai melakukan proses download dari sumber file yang ada di internet ( kemungkinan file-file yang kita download dari limewire merupakan file-file pengguna limewire yang sedang online di internet ).
kembali ke traffic internet, ketika limewire mulai mendownload file-file dari internet terlihat bahwa sumber file0file tersebut adalah IP , bukan domain/URL, dan port yang digunakan juga acak, tidak terpola (gak teliti kali ngeliatnya). nah dengan ciri-ciri seperti ini bagaimana cara memblokir nya ?
Solusi 1 : Dengan membatasi koneksi internet user yang positif menggunakan limewire.
solusi ini ternyata tidak berhasil karena dengan membatasi kecepatan koneksi internet user pengguna limewire akan mengakibatkan user tersebut tidak bisa menggunakan aplikasi internet lainnya (email / browsing) ketika ia sedang menggunakan limewire karena bandwidth yang kita batasi telah penuh terpakai oleh software tersebut.
solusi ini ternyata tidak berhasil karena dengan membatasi kecepatan koneksi internet user pengguna limewire akan mengakibatkan user tersebut tidak bisa menggunakan aplikasi internet lainnya (email / browsing) ketika ia sedang menggunakan limewire karena bandwidth yang kita batasi telah penuh terpakai oleh software tersebut.
Solusi 2 : Dengan memodifikasi firewall. Cara ini ternyata berjalan dengan baik, cara nya, kita harus mem-blok semua koneksi keluar yang melalui protokol TCP mulai dari port 1 sampai dengan port 65535, nah setelah itu baru kita buka port-port yang ingin kita buka , misal port 80, 443, 25,110 dts (sesuai dengan kebutuhan).jangan lupa untuk memblok URL yang mengandung kata "limewire" untuk mencegah user lain mendownload software tersebut.
Yah begitulah laporan mingguan bulan ini. selamat mendownload :p
Selasa, 15 Juli 2008
-Mendadak Moto-

This is Prewed
Perihal : Prosesi Pengambilan Gambar untuk "Nita-Rosi"
Lokasi : Daru, Tigaraksa-Banten
Objek Penderita : Nita-Rosi
Tim Hura-hura : Ari, Catur, Dian, Ina, Epri !
Juru Gambar : Si Keren
Minggu, 06 Juli 2008

Langganan:
Postingan (Atom)